ddrescue — Your Data's Last Lifeline
L
"Success is not final; failure is not fatal."
I don't care if I fail or succeed; I never give up.
Search for a command to run...
No comments yet. Be the first to comment.
"ddrescue got your data off the dying drive. Now what? This is where you actually get it back." 🚑 The Big Picture First A lot of people think ddrescue restores data. It doesn't — not directly. Here
Most teams treat SELinux as an obstacle. The teams that thrive in production treat it as a superpower. Here's everything you need to know to move from frustrated to fluent. If you've ever Googled a
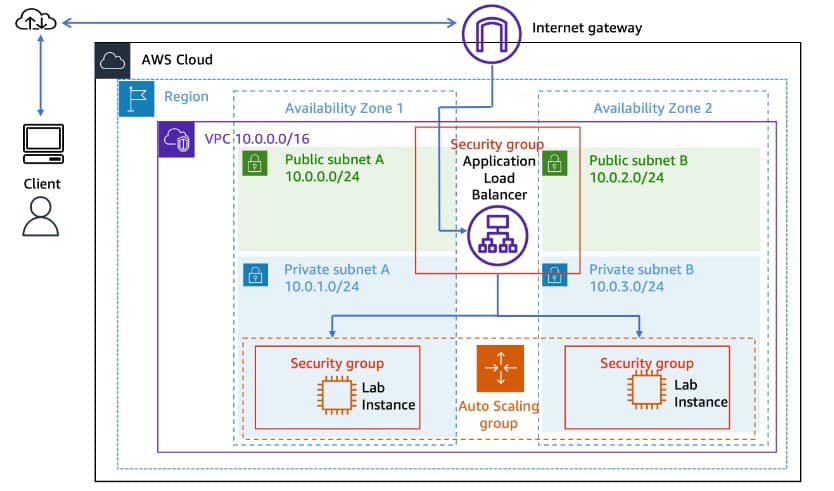
Application Load Balancer? A load balancer serves as the single point of contact for clients. The load balancer distributes incoming application traffic across multiple targets, such as EC2 instances, in multiple Availability Zones. This increases th...
In this Lab you will get the idea of the following: Created an Amazon EC2 launch template Created an Amazon EC2 Auto Scaling launch configuration Configured scaling policies and created auto Scaling group to scale in and scale out the number of se...

"Your hard drive is making a clicking sound. Your stomach drops. Don't panic — ddrescue has your back."
Imagine your hard drive is a library. Some books are fine. Some are wet and falling apart. A normal copy tool (dd) would try to photocopy every single page in order — and the moment it hits a ruined page, it stops.
ddrescue is smarter. It says:
"Skip the damaged pages for now. Let me grab everything I can first — then I'll come back and carefully try the tough ones."
That's it. That's the whole idea. It's a data rescue tool that copies data from broken, dying, or corrupted storage devices — hard drives, CDs, DVDs, USB sticks — while being smart enough to work around the damage.
Before anything else, let's get it on your machine. One important note:
⚠️ Don't confuse
gddrescue(GNU ddrescue) withdd_rescue(different tool, different developer). You want the GNU one.
# Ubuntu / Debian
sudo apt install gddrescue

# Fedora
sudo dnf install ddrescue

# Arch Linux
sudo pacman -S ddrescue

# macOS (via Homebrew)
brew install ddrescue
Check it's working:
ddrescue --version
# Should print: GNU ddrescue 1.27 (or similar)
ddrescue [options] source destination [logfile]
Three things you need to know:
| Part | What it is | Example |
|---|---|---|
source |
The broken thing you're reading FROM | /dev/sda |
destination |
Where the rescued data goes TO | rescue.img |
logfile |
A progress notebook (optional but please use it) | rescue.log |
The logfile is ddrescue's memory. Without it:
❌ If your computer crashes mid-rescue, you start from zero
❌ You can't retry only the bad sectors later
❌ You lose all progress tracking
With it:
✅ Stop and resume anytime
✅ Run multiple targeted passes
✅ Know exactly what was saved and what wasn't
Always use a logfile. No exceptions.
These are the switches you can flip. Let's cut through the jargon.
-n · --no-scrape — "Just grab the easy stuff first"ddrescue -n /dev/sda rescue.img rescue.log
Normally ddrescue tries damaged areas repeatedly during its first pass. This flag says skip them — just read the healthy parts as fast as possible.
Use it when: The drive is barely alive and you need data off it fast before it dies completely.
-r N · --retry-passes=N — "How many times to bang on a stuck door"ddrescue -r 3 /dev/sda rescue.img rescue.log
After the main read, ddrescue retries failed sectors. This sets how many times.
| Value | Meaning |
|---|---|
-r 0 |
Don't retry at all |
-r 3 |
Try each bad sector 3 times |
-r -1 |
Keep retrying forever (default) |
Use it when: You want to control how long the retry phase runs. -r 3 is a good balanced choice.
-d · --direct — "Talk directly to the hardware, skip the middleman"ddrescue -d /dev/sda rescue.img rescue.log
Your OS keeps a cache in RAM to speed up reads. For a healthy drive, great. For a broken one, it can interfere with error detection. This flag bypasses the cache and reads straight from the device.
Use it when: Almost always, especially on failing physical drives.
-f · --force — "Yes I know the file exists, do it anyway"ddrescue -f /dev/sda rescue.img rescue.log
If rescue.img already exists, ddrescue normally refuses to overwrite it (to protect you). This flag overrides that protection.
🔴 Be careful. If you point this at the wrong file, you'll overwrite data you worked hard to rescue. Double-check your paths.
-i POS · --input-position=POS — "Start reading from here, not the beginning"ddrescue -i 512MiB /dev/sda rescue.img rescue.log
Tells ddrescue to start reading at a specific byte offset in the source. Useful when only part of a drive is damaged.
You can use human-friendly sizes: 512B, 10KiB, 500MiB, 2GiB.
-o POS · --output-position=POS — "Start writing from here in the destination"ddrescue -i 500MiB -o 0 /dev/sda rescue.img rescue.log
Pairs with -i to let you map a specific part of the source to a specific position in the output.
-s SIZE · --size=SIZE — "Only copy this much data"ddrescue -s 50GiB /dev/sda rescue.img rescue.log
Limits how much data is copied total. Handy for partial recoveries of large disks — you don't need to image a 4TB drive if the important stuff is in the first 100GB.
-b SIZE · --sector-size=SIZE — "Tell ddrescue the disk's page size"ddrescue -b 4096 /dev/sda rescue.img rescue.log
Most old drives use 512-byte sectors. Newer drives and SSDs use 4096 bytes (called "4K" or "Advanced Format"). If you're getting weird errors, try this.
For CDs and DVDs, the sector size is 2048.
-c NUM · --cluster-size=NUM — "How big a chunk to read at once"ddrescue -c 64 /dev/sda rescue.img rescue.log
Bigger chunks = faster on healthy areas. Smaller chunks = more precise around damaged areas. ddrescue picks a sensible default; only change this if you know what you're doing.
-v · --verbose — "Tell me more of what's happening"ddrescue -v /dev/sda rescue.img rescue.log
ddrescue -vv /dev/sda rescue.img rescue.log # even more detail
Prints more information as it runs. Double -vv goes deeper. Good for diagnosing mysterious failures.
-T INTERVAL · --timeout=INTERVAL — "Give up after this long with no progress"ddrescue -T 30m /dev/sda rescue.img rescue.log
If ddrescue goes this long without reading any new data, it stops automatically. Useful in scripts or when you can't babysit the process.
ddrescue doesn't just blindly copy. It works through three distinct acts, each with a different job. Think of it as a heist movie — a plan, the tricky part, and the last-ditch effort.
"Don't overthink it. Grab what you can."
The moment you run ddrescue, it sprints across the entire drive reading data in large, hungry chunks. If a sector gives trouble? It doesn't stop. Doesn't argue. Just marks it in the logfile and moves on.
This is intentional. A dying drive has limited reads left in it. Spending precious time wrestling with one bad sector — while hundreds of good ones sit unread — is a terrible trade. So ddrescue sweeps fast, fills the image with everything easy, and leaves the hard stuff for later.
What you get after Act I: 90–98% of your data, gathered quickly.
[Drive]  ████████████░░█████░████████░░░█████████  →  [Image]
          good  good  bad  good  bad good  good
                             ↑ skipped, noted in log
"Okay, let's go back and really look at those problem spots."
Now ddrescue circles back to every sector it skipped. But this time, instead of reading big blocks, it shrinks the read size down — slicing each error zone into tiny pieces and testing them one by one.
Why? Because not all damage is total. A 64KB chunk might have failed because of 512 bad bytes in the middle — and the other 63.5KB is perfectly fine. By zooming in, ddrescue can often rescue the good parts of a partially damaged block.
This phase is slower. It's harder on the drive. But it finds data that a simpler tool would have written off entirely.
What you get after Act II: Many of those "bad" blocks turn out to be only partially bad — and you recover more than you expected.
[Bad block from Act I]

Before:  ░░░░░░░░░░░░░░░░░░░░░░░░░░░░░░  (entire block = unknown)
After:   ████████░░░░████████████░░░████  (most of it = rescued!)
                 ↑              ↑
           truly bad       truly bad
"Some doors just need you to knock more than once."
After Acts I and II, a small set of sectors still haven't yielded any data. These are the stubborn ones. In Act III, ddrescue goes back to them and tries again — controlled by the -r flag.
This exists because storage errors are sometimes intermittent, not permanent. A sector that fails 9 out of 10 times might succeed on try number 10 due to slight temperature changes, drive head realignment, or just luck. ddrescue exploits this by retrying methodically.
You control how hard it tries with -r N. Using -r 3 means three extra attempts per sector. Using -r -1 means it never gives up.
What you get after Act III: Every sector that could be recovered, has been.
Sector #48291:   ❌ failed  →  ❌ failed  →  ✅ recovered!  (on retry 2)
Sector #91042:   ❌ failed  →  ❌ failed  →  ❌ truly gone
💡 The lesson: Some data that looks lost in Act I is quietly waiting to be found in Acts II and III. Don't skip the phases.
You've got a failing drive. You want an image of it. This is your starting point:
sudo ddrescue -d /dev/sda rescue.img rescue.log
When a drive is really struggling, don't fight it all at once. Do it in two stages:
# Pass 1 — fast, skips bad areas entirely
sudo ddrescue -d -n /dev/sda rescue.img rescue.log

# Pass 2 — goes back and tries bad areas up to 3 times
sudo ddrescue -d -r 3 /dev/sda rescue.img rescue.log
💡 Same logfile, same image file. ddrescue picks up exactly where Pass 1 left off.
Your computer crashed or you had to stop. Just run the same command again:
sudo ddrescue -d /dev/sda rescue.img rescue.log
# ddrescue reads the logfile and continues from where it stopped
No extra flags needed. The logfile handles everything.
Optical media has 2048-byte sectors, not 512. Always specify this:
sudo ddrescue -d -b 2048 /dev/cdrom disc.iso disc.log
If only one partition is damaged, target it directly:
sudo ddrescue /dev/sda2 partition2.img partition2.log
Some drives have physical head issues. Reading backwards can help:
sudo ddrescue -R /dev/sda rescue.img rescue.log
1. Never work on the original device. Always make an image first. Every read wears out a dying drive. Do your file recovery on the image, not /dev/sda.
2. Mount images read-only.
sudo mount -o loop,ro rescue.img /mnt/recovery
The ro flag prevents accidental writes to your rescued image.
3. Verify your paths before using -f. The force flag can overwrite a recovery image you spent hours building. Look twice.
4. Put the image on a different drive. Writing the rescue image back to the same failing drive is asking for trouble.
5. Check the logfile to see what was saved.
cat rescue.log
# Shows status of every region: copied, non-tried, bad-sector
6. Use ddrescuelog for more analysis.
ddrescuelog -t rescue.log                   # print totals summary
ddrescuelog -l bad-sectors rescue.log       # list bad sector positions
7. Pair with file-recovery tools afterward. ddrescue saves the blocks. These tools find the files inside:
TestDisk — recovers lost partitions and boot sectors
PhotoRec — carves individual files from raw images
Foremost — file carving by file signature
ddrescue [options] source destination [logfile]

Most useful flags:
  -n          Skip scraping (fast first pass)
  -r N        Retry bad sectors N times
  -d          Direct hardware access (bypass cache)
  -f          Force overwrite of existing destination
  -i POS      Start reading at offset POS
  -o POS      Start writing at offset POS
  -s SIZE     Copy only SIZE bytes total
  -b SIZE     Set sector size (default 512, CD/DVD: 2048)
  -R          Read in reverse direction
  -v / -vv    Verbose / very verbose output
  -T INTERVAL Stop if no progress for INTERVAL

Recommended two-pass recovery:
  sudo ddrescue -d -n  /dev/sda image.img image.log   # pass 1
  sudo ddrescue -d -r3 /dev/sda image.img image.log   # pass 2
| Media Type | Example Source |
|---|---|
| Hard drive (HDD) | /dev/sda, /dev/sdb |
| SSD | /dev/nvme0n1 |
| USB drive | /dev/sdc |
| SD card | /dev/mmcblk0 |
| CD / DVD | /dev/cdrom, /dev/sr0 |
| Partition | /dev/sda1, /dev/sda2 |
| Existing image file | old_rescue.img |
ddrescue won't save every byte on every drive. Sometimes sectors are simply gone. But it gives every recoverable sector its best possible chance — methodically, patiently, and without making things worse.
If your storage device is in trouble:
Stop using it immediately — more writes = more damage
Install ddrescue
Run a two-pass rescue to an image file on a healthy drive
Work from the image
The data you save might be irreplaceable. Give it every chance.
GNU ddrescue · Version 1.27 · Official Manual