Amazon Virtual Private Cloud (VPC)

Points to be noted:
A Virtual Private Gateway (VPC) is like a data center but in the cloud. Its logically isolated from other virtual networks from which you can spin up and launch your AWS resources within minutes.
Private Internet Protocol (IP) addresses are how resources within the VPC communicate with each other. An instance needs a public IP address for it to communicate outside the VPC. The VPC will need networking resources such as an Internet Gateway (IGW) and a route table in order for the instance to reach the Internet.
An Internet Gateway (IGW) is what makes it possible for the VPC to have Internet connectivity. It has two jobs: perform network address translation (NAT) and be the target to route traffic to the internet for the VPC. An IGW's route on a route table is always 0.0.0.0/0.
A subnet is a range of IP addresses within your VPC.
A route table contains routes for your subnet and directs traffic using the rules defined within the route table. You associate the route table to a subnet. If an IGW was on a route table, the destination would be 0.0.0.0/0 and the target would be IGW.
Security groups and Network Access Control Lists (NACLs) work as the firewall within your VPC. Security groups work at the instance level and are stateful, which means they block everything by default. NACLs work at the subnet level and are stateless, which means they do not block everything by default.
Configuring Amazon VPC using the AWS Management console:
Step 1: Open the AWS account, search, and click VPC

click again on VPC


Step 2: Click on VPC only, give the name of your choice, and change the required IPv4 CIDR as needed, then leave all other things to default, scroll down, and click Create VPC:


Step 3: After the above interface click on Subnets as shown and again click on Create subnet

Step 4: Select the VPC that we created above
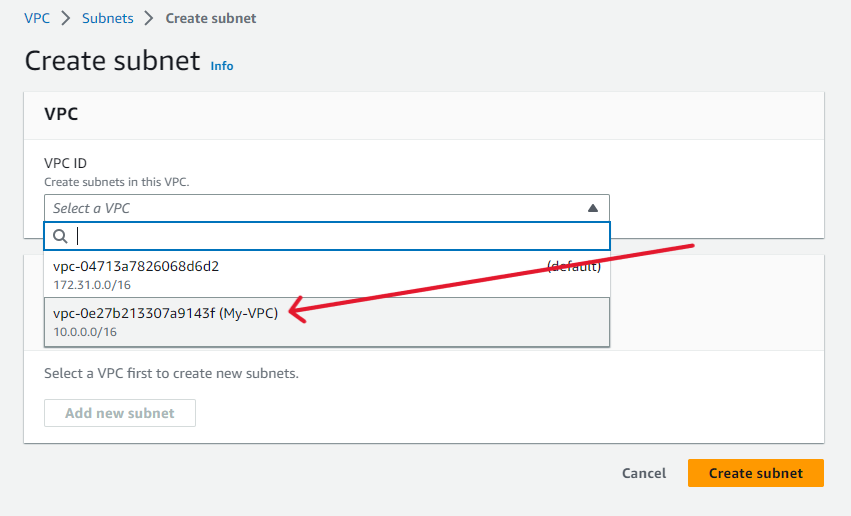
Scroll down and give the Subnet name: private subnet or anything you like which going to be our private subnet, also select any availability zone of that region and specify the IPv4 CIDR block (eg. 10.0.0.0/24)according to your needs.
Also, repeat for a public subnet with a Subnet name: public subnet or anything you like which going to be our public subnet. Also select any availability zone of that region and specify the IPv4 CIDR block (eg. 10.0.1.0/24)according to your needs.
Step 5: After creating two subnets we have to create two route tables so, click on Route tables and then Create route table

Step 6: Give any name you like and select VPC which we created above and then Create route table
For simplicity give names public_route_table and private_route_table and create two route tables.

Step 7: Now click on Internet gateways and Create Internet gateway as:

specify the gateway name as you like and click on Create internet gateway

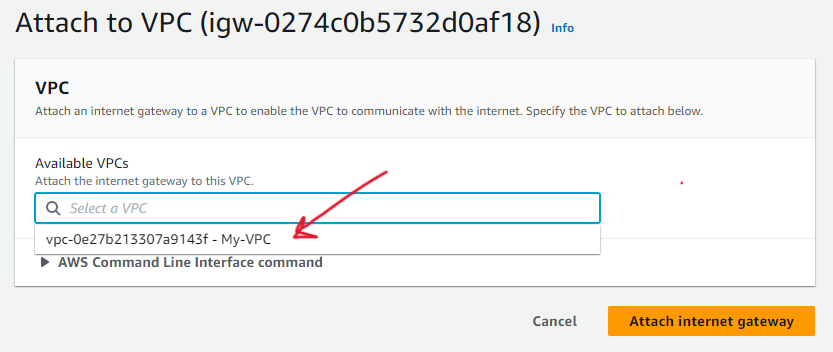
Step 8: Then click on Attach to VPC and attach that you created above as:

Step 9: Also we have to create NAT as:
- select NAT gateways and create NAT gateway
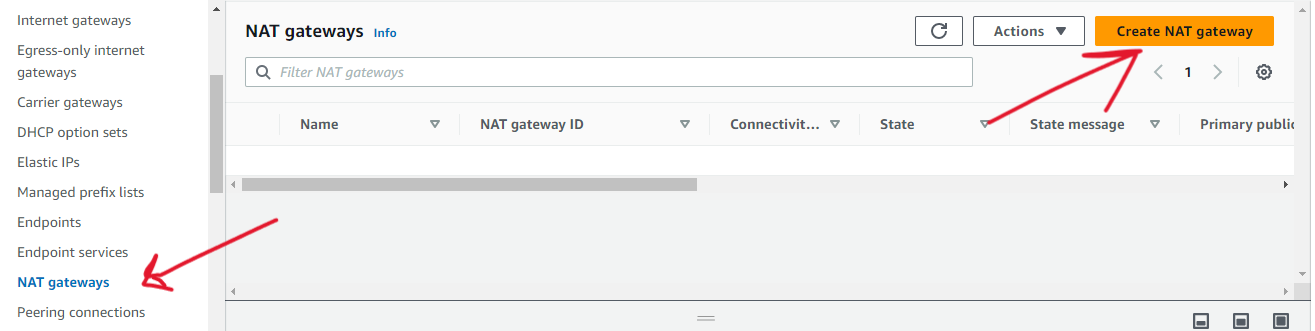
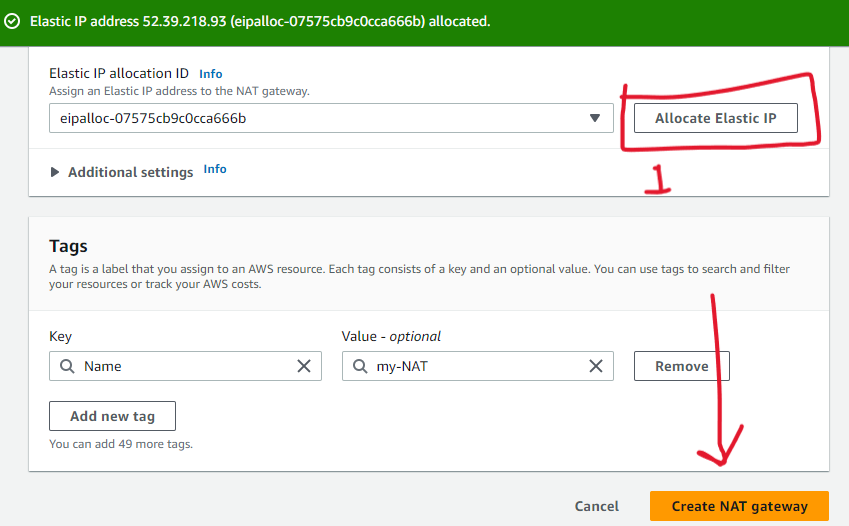
Give a name eg. my-NAT and select a subnet that needs to be public.

- Then click on Allocate Elastic IP and Create NAT gateway
Step 10: Add route to route table and associate subnet to the route table
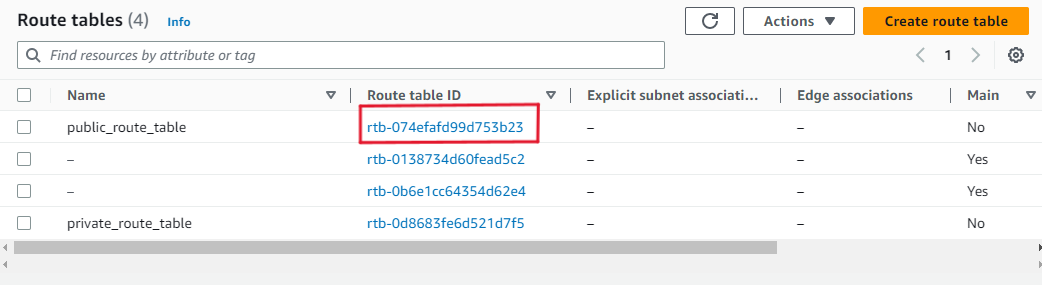
Goto route tables and select Route table ID of public_route_table
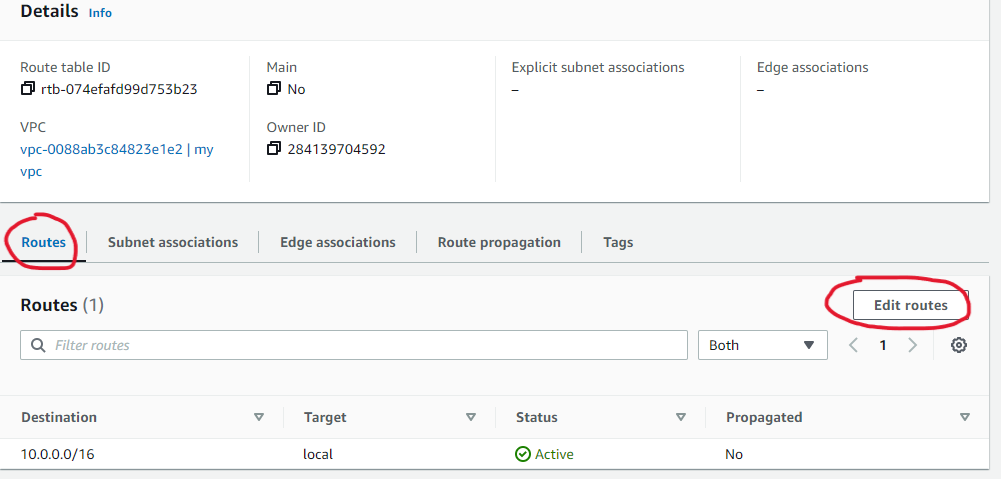
Click on Routes -> Edit routes
Click on [Add route] -> select 0.0.0.0/0 -> Click in the Target section and select Internet Gateway that we created since you are targeting any traffic that needs to go to the internet to the IGW.

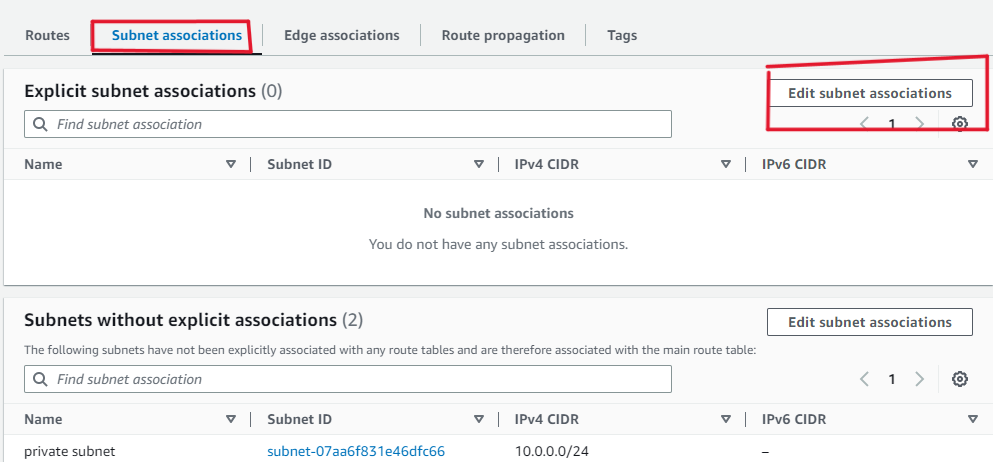
Save changes -> click on Subnet associations -> Edit subnet associations
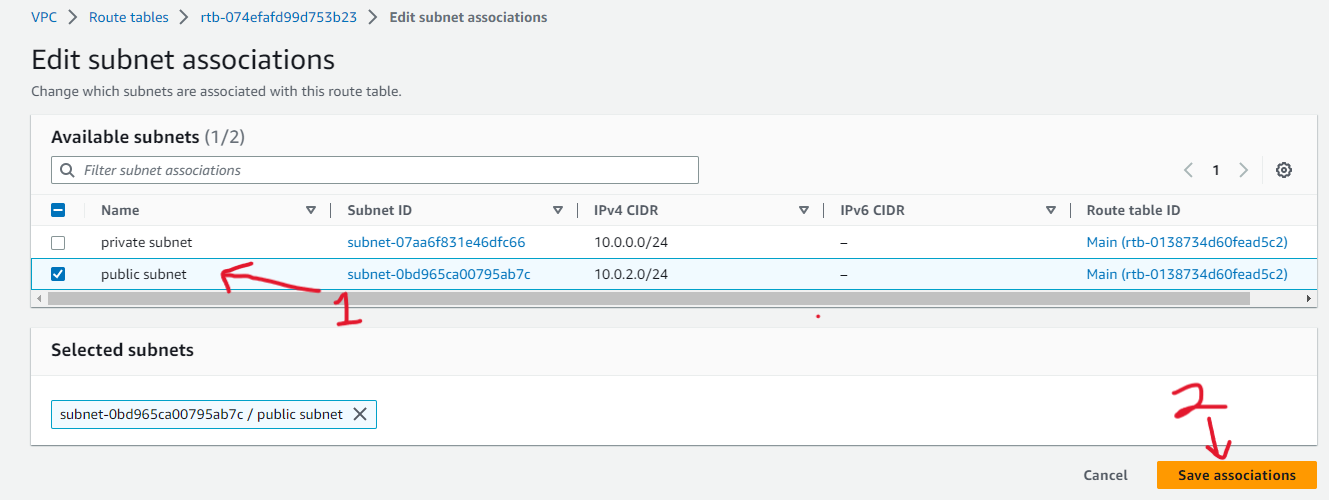
select the public subnet for the public route table and save associations
Go back and select Route table ID of private_route_table
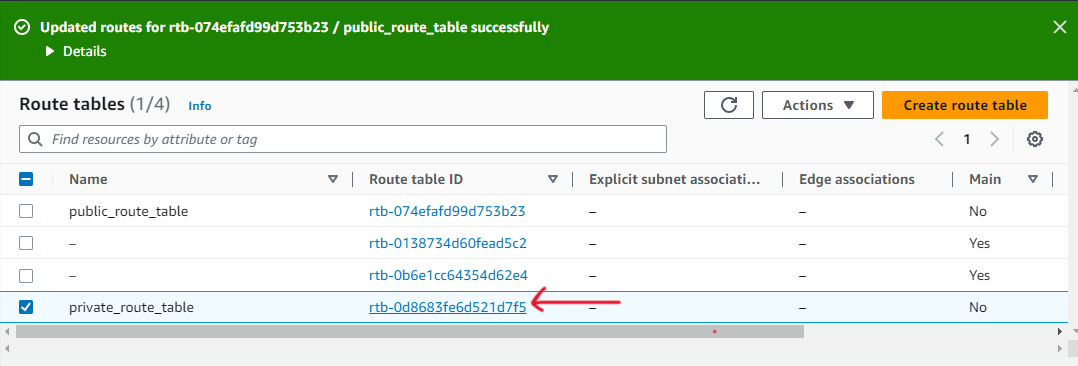
Routes -> Edit routes
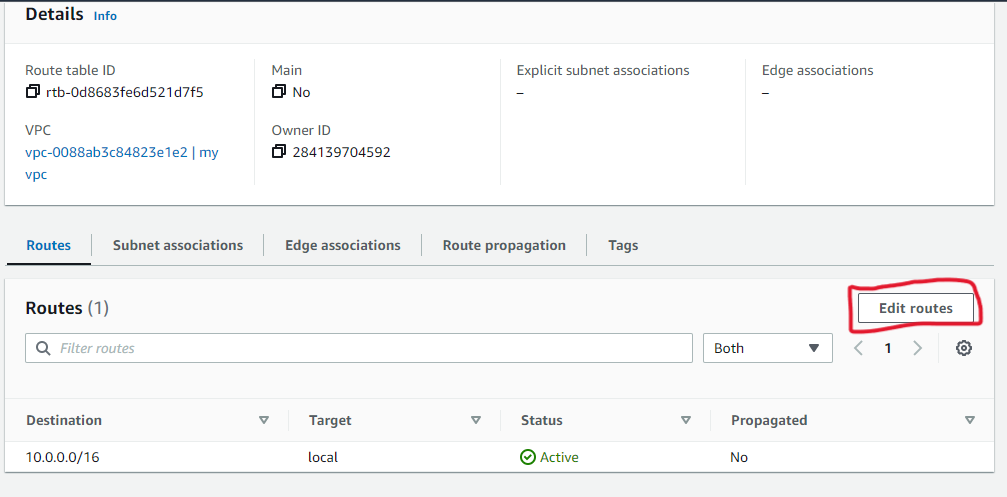
Click on Add route -> select 0.0.0.0/0 -> select NAT Gateway -> Save changes
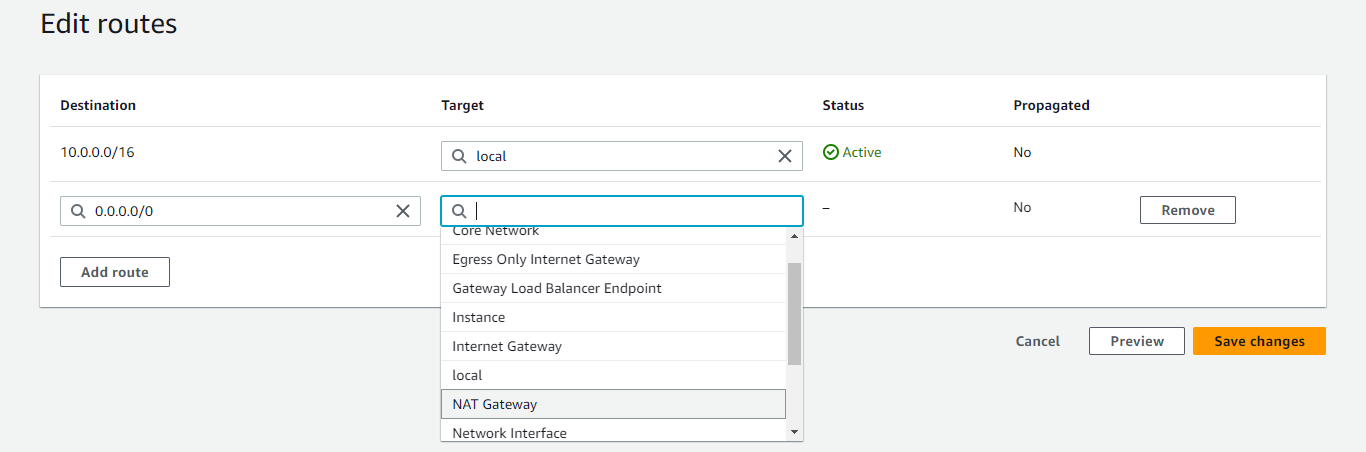
Goto Edit subnet associations and select private subnet for private route table -> save associations.
Step 11: Now create two EC2 instances, one for the public subnet and another for the private.
Search EC2 and select instances -> Launch instance
Name: myPublic
Create key pair (give any name and select pem for Linux user and ppk for putty user)
Network setting -> Edit
VPC: select that we created above
subnet: public subnet since it is public instance
Auto-assign public IP: enable
*Leave all default or you can add as other thing as required.
Again Launch instance for private subnet
Name: myPrivate
Select same key pair (if same key selected convert ppk file to pem if putty used) or create new key (give any name and select pem)
Network setting -> Edit
VPC: select that we created above
subnet: private subnet since it is private instance
Auto-assign public IP: disable
*Leave all default or you can add other things as required.
Step 12: Connect to the private instance using public instance
Connect public instance using a key that we created.
create new file
nano new.pemand paste content of pem file that we downloaded (or converted from ppk file)Give permission as
chmod 400 new.pemConnect to private instance from public instance
ssh -i new.pem ec2-user@<private-ip-of-myPrivate-instance>Now check
ping google.comto confirm private instance connected with internet or not

